Last Updated: September 20, 2020

Nesting test cases with kotlin

Description: As features and requirements grows in our application, code and test cases grows hand in hand. It becomes very difficult to track the test cases with lots of them in single class. 

Consider a sample unit test class in Kotlin with bunch of test cases in single class

class ClientTest {

@Test
fun create(){
assert(true)
}
@Test
fun delete(){
assert(true)
}

@Test
fun connected(){
assert(true)
}

@Test
fun disconnected() {
assert(true)
}
}
fig.1

                                                        fig. 1

Well nothing wrong with test cases. 

Just imagine if you have 100+ tests within fig.1

By looking at fig.2 results it becomes difficult to figure out,

1. What exactly does these tests do ? or 

2. What's the logical connection within unit tests? etc 

That's where nesting comes useful for developers.

Consider a nesting sample with Kotlin

class ClientTest {

@Nested
inner class Operations{
@Test
fun create(){
assert(true)
}
@Test
fun delete(){
assert(true)
}
}

@Nested
inner class Client {
@Test
fun connected(){
assert(true)
}

@Test
fun disconnected(){
assert(true)
}
}
}

                                                   fig. 3

                                                     
                                                    fig. 4

We can now clearly make some distinction that, class in connecting to a client and doing some operations. (fig. 3 and fig. 4)

Although nesting is just a logical separation of test cases, it's very handy for developers in large scale projects.

For more updates follow us on -  Twitter

#codingIsAnArt #coderconsole


Last Updated: October 30, 2019

Tips and Tricks android developer should know - part 5

Description: Hello coders! In this post I'm gonna show some interesting tips and tricks you can start using in your android project.

Also check out Part 1,Part 2Part 3 and Part 4

So let's get started.

1. How to remove boiler plate code of  Parcelable interface?

Let's consider this class with Parcelable Interface implementation. This class contains overriden methods which are boiler plate at larger extends

class User(val id: String, val name: String, val age: Long, val address: String, val isPrime: Boolean, val contact: String) : Parcelable {
    constructor(parcel: Parcel) : this(
            parcel.readString(),
            parcel.readString(),
            parcel.readLong(),
            parcel.readString(),
            parcel.readByte() != 0.toByte(),
            parcel.readString())

    override fun writeToParcel(parcel: Parcel, flags: Int) {
        parcel.writeString(id)
        parcel.writeString(name)
        parcel.writeLong(age)
        parcel.writeString(address)
        parcel.writeByte(if (isPrime) 1 else 0)
        parcel.writeString(contact)
    }

    override fun describeContents(): Int = 0

    companion object CREATOR : Parcelable.Creator {
        override fun createFromParcel(parcel: Parcel): User {
            return User(parcel)
        }

        override fun newArray(size: Int): Array {
            return arrayOfNulls(size)
        }
    }

}

So here comes @Parcelize annotation into picture. Lets modify our User class using @Parcelize
@Parcelize
class User(val id: String, val name: String, val age: Long, val address: String, 
           val isPrime: Boolean, val contact: String) : Parcelable

@Parcelize is the part of androidExtensions we have to enable it by adding below snippets within module's build.gradle section.
android {
    ...
    androidExtensions {
        experimental true
    }
    ...
}

2. Using Plurals

Although plurals where introduced long time back, but have seen developers adding logics for plural strings. Let's take an example of adding plural, when any post is liked.
    <plurals> name="like_count">
        <item quantity="one">%d second ago</item>
        <item quantity="other">%d seconds ago</item>
    </plurals>


Access within the code
mContext.resources.getQuantityString(R.plurals.like_count, 1, 2)

#Output:
2 second ago

#Note: First argument matches the plural and second is the argument for %d 

3. How to Change Default layout of activity?


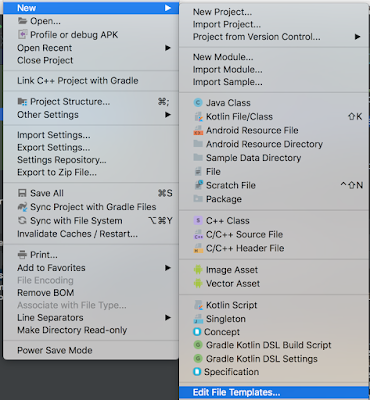
Its interesting because it will help to add some constant template(toolbar in all the activity etc ) which we normally add after the activity is created, henceforth saving time. Simply Go to File -> New -> Edit File Templates


Edit Templates
Edit Templates

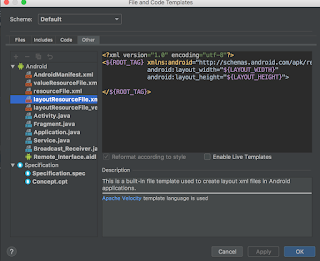
Change Default Tag of any layout.xml
Changing Root Tag for layouts

In the above example we can simply replace  ROOT_TAG with <LinearLayout> and next time when we create new layout it will start with <LinearLayout>


Bingo we're done.

For more updates follow us on -  Twitter

#codingIsAnArt
#coderconsole

Last Updated: June 19, 2019

How to create docker image with NodeJs and Grunt?

Description: In this post I'm gonna show you how to create Docker Image for Nodejs project using Grunt

Note:
Grunt:  Its a Javascript task runner. In this project we'll use for minification of our .js file.
Docker:  Its a platform where we gonna place containerised image of our NodeJs Project.

Github Project

So lets get started.

Step 1:  Create index.js

//Import Express
var express = require('express')
var app = express()

//Import Path
var path = require('path')

//Mounting our .js from build folder.
app.use("/build", express.static(__dirname + "/build"))

//Capture the base url
app.get('/', function(req, res){
 res.sendFile(__dirname + "/index.html")
})

//Listen on port 9000
app.listen(9000, function(){
 console.log('Lisening on port 9000')
})

Note: build folder will be created after we run our Gruntfile

Step 2:  Create package.json

{
  "name": "demo-docker-nodejs-grunt",
  "version": "1.0.0",
  "description": "",
  "main": "index.js",
  "scripts": {
    "build": "grunt uglify",
    "start": "node index.js"
  },
  "author": "coderconsole",
  "license": "ISC",
  "dependencies": {
    "express": "^4.17.1",
    "grunt": "^1.0.4",
    "grunt-cli": "^1.3.2",
    "grunt-contrib-uglify": "^4.0.1"
  }
}


Note: 
dependencies: Its contains all the dependencies we needed within the project.
scripts: Its contains grunt uglify to minify our .js and and start to start the nodejs app.

Step 3:  Create Gruntfile.js parallel to package.json and echo.js within src/ folder(just to separate our code structure)

Gruntfile.js
//Setting grunt
module.exports = function(grunt){

    //Setting Init Config from package.json
    grunt.initConfig({

        //Read package.json and assign it to 'pkg'
        pkg: grunt.file.readJSON('package.json'),


        uglify: {
              options: {
                banner: '/*! <%= pkg.name %> <%= grunt.template.today("yyyy-mm-dd") %> */\n'
              },
              build: {
                src: 'src/echo.js',
                dest: 'build/echo.min.js'
           }
        }
    });

    // Load "uglify" task
    grunt.loadNpmTasks('grunt-contrib-uglify')

    // Load default task
    grunt.registerTask('default', ['uglify'])

};


echo.js within src/ folder
function echoNameFunction(data) {
       return "<h2>Welcome " + data + "</h2>"
}


Step 4:  Create Dockerfile
# Select the Node Module
FROM node:11

# Add the working Directory
WORKDIR /app

# COPY out package.json to our working directory /app
COPY package*.json /app/

# RUN npm install which will download all the dependencies from package.json
RUN npm install

# COPY the current content to /app folder structure
COPY . /app/

# UGLIFY the src/*.js
RUN npm run build

# EXPOSE our port
EXPOSE 9000

# Create EntryPoint of index.js file
ENTRYPOINT ["node", "index.js"]


Note: Dockerfile contains steps which get executed sequentially. Please read comments for what each steps does.

Step 5:  Create index.html
<html lang="en">
<head>
    <script src="build/echo.min.js"></script>

    <script>
        function display(){
            var name = document.getElementById('firstname').value
            document.getElementById('display').innerHTML = echoNameFunction(name)
        }
    </script>
</head>
<body>
<label for="firstname">Enter your first name</label>
<input id="firstname" name="firstname" type="text"/>
<button onclick="display()">
    Click!
<p id="display"></p>
</body>
</html>


Step 6:  Create .dockerignore file to avoid node_modules or build folder get added into the image

**/node_modules
build/*.js
.idea/

Step 7:  Finally, lets create our docker image and run it using below command.
Build Docker image
docker build -t docker-node-grunt:1.0.0 -f Dockerfile .

Run Docker image
docker run -p 9000:9000 docker-node-grunt:1.0.0

Now, open browser and hit url http://localhost:9000/


Bingo! We've successfully deployed our nodeJs application in docker using grunt.

Github Project

#codingIsAnArt 

Last Updated: September 19, 2018

Kotlin Reified Type

Description: In this post I'm gonna explain what is koltin reified types? with sample examples and explanation about its need and requirement in our application

If you are new to Koltin I recommend Switch from Java to Kotlin

So let's get started.


Why we need to know reified types?

Consider an below example in 'Java' which takes JSON and convert that into equivalent model class using Gson library (you can use any other parsing library like Jackson etc).

public T createModelFromClass(String jsonString) {
    return new Gson().fromJson(jsonString, T.class);
}

Now, if you try this way it will show an error saying "Cannot select from type variable". Because of "type erasure" in java generics which erased the type at run time.
Let's fix this!
public T createModelFromClass(String jsonString, Class<T> classT) {
    return new Gson().fromJson(jsonString, classT);
}

Consider the same example in kotlin

fun <T> createModelFromClass(jsonString: String): T {
    return Gson().fromJson(jsonString, T::class.java)
}
Now, if you try this way it will show an error saying ' Cannot use 'T' as reified type parameter. Use a class instead.

Because like in java the Generics 'T' get erased at run time.

Let's fix this!

fun <T: Any> createModelFromClass(jsonString: String, tClass: KClass<T>): T {
    return Gson().fromJson(jsonString, tClass.java)
}

Here comes the need!

In java and koltin example above, we need to pass the 'Class' so that the bytecode of the class could be generated at runtime.

Introducing reified type!
Reified in combination with inline function generates the bytecode of the class at runtime. So the overhead of passing <KClass> would be avoided within function.

How to use reified type?

Let's modify the above example of koltin using reified type


inline fun <reified T : Any> createModelFromClass(jsonString: String): T {
    return Gson().fromJson(jsonString, T::class.java)
}

Note: This functions with reified type are not callable from Java code.

Sample within the activity

class MainActivity : AppCompatActivity() {

    val USER_JSON = "{\"id\": 1000,\n" +
            " \"name\": \"nitesh tiwari\",\n" +
            " \"email\": \"[email protected]\"\n" +
            "}"
    override fun onCreate(savedInstanceState: Bundle?) {
        super.onCreate(savedInstanceState)
        setContentView(R.layout.activity_main)

        val userModel = createModelFromClass<User>(USER_JSON)
        Log.d("Reified", "\nName: " + userModel.name + "\nId:" + userModel.id + "\nEmail:" + userModel.email)
    }


    data class User(var id: Int, var name: String?, var email: String?)

    inline fun <reified T : Any> createModelFromClass(jsonString: String): T {
        return Gson().fromJson(jsonString, T::class.java)
    }
}


Output:

Name: nitesh tiwari
Id:1000
Email:[email protected]


Bingo! We are done. We have just avoided the overhead of passing the 'KClass' in method constructor to generate its byte code at runtime.


Last Updated: April 09, 2018

Koltin Extension functions and Operator Overloading examples

Description: In this post I'm gonna explain you guys how 'Kotlin' gives us the power to play around with our code using 'Extension function' and 'Operator Overloading'.

Note: If you are new to Kotlin. I strongly recommend Switch from Java to Kotlin and Kotlinlang

So lets get started.


1. Kotlin Extension functions:

Why Extensions?
Extension empower as to extend the functionality of the existing classes without overriding the whole structure. Its fun !!!

Syntax:
fun <InheritingClassName>.<functionName>()

e.g : fun String.firstCharacterUpperCase(): String


Example 1:

Consider a requirement about making the first character 'CAPITAL' for logged in user in your app.

Using Extension:

fun String.firstCharacterUpperCase(): String {
    return if (this[0].isLowerCase())
        this[0].toUpperCase().plus(this.substring(1, this.length))
    else        this 
}

Explanation: This extension function return a String by making the first character in 'CAPITAL'

Note: 'this' means the inherited class. In our example its 'String'

So simply call:
fun printName(){
    val name = "nitesh tiwari".firstCharacterUpperCase()
    println("Name: $name")
}

//OutPut:
//Name: Nitesh tiwari


Example 2: 

Consider a requirement of getting a list on odd and even indexes respectively.

Using Extension:
fun <T> ArrayList<T>.oddEvenArrayItems(oddOrEven: Int): ArrayList<T> {
    val list = arrayListOf<T>()
    forEachIndexed { index, genericObject ->
        if (index % 2 == oddOrEven)
            list.add(genericObject)
    }
    return list
}

Explanation: This extension function returns generic ArrayList<T> whose index can we either odd or even based on input params.

So simply call:
fun printData(){
    val arrayList = arrayListOf<Int>(2,3,4,5,6,7,8,9,10, 11)
    val odd = arrayList.oddEvenArrayItems(1)
    val even = arrayList.oddEvenArrayItems(0)

    println("odd: $odd")
    println("even: $even")

    //OUTPUT
    //odd: [3, 5, 7, 9, 11]
    //even: [2, 4, 6, 8, 10]}

2. Operator Overloading:


Why Operator Overloading:
Operator overloading in Kotlin provide us the power to change the implementation of operators like plus(+),times(*),unaryplus(++),plusAssign(+=) and many many more on our 'Custom Objects'. Highly powerful !!!

Note: Operator names should be same.

Syntax:
operator fun <operatorName>()
e.g: operator fun plus()

Example 1: Consider a requirement where you want to add the price of the shopping cartItem together.

class CartItem(val price: Double, val name: String) {

    val itemName: String? = null
    operator fun plus(other: CartItem): Double =
        price + other.price
    
}

fun addPrice() {
    val cartItem1 = CartItem(10.6, "Bag")
    val cartItem2 = CartItem(20.4, "Shoes")

    val total: Double = cartItem1 + cartItem2
    println("Total Cost: $total")

    //OUTPUT:    //Total Cost: 31.0
}
Explanation: We have created a class 'CartItem' which contains the price of the shopping item and overridden the plus(+) operator for adding the prices together and returning the result. Looks simple right?.

Let's checkout one more example to understand operator overloading in combination of extension function


Example 2: Finding the item by productId in the List<CartItem>

class CartItem(val productId: Int, val price: Double, val name: String)

class Cart(val mList: List<CartItem>) {

    operator fun contains(id: Int): Boolean =
        mList.hasProductId(id)

    fun List<CartItem>.hasProductId(productId: Int): Boolean {
        forEachIndexed { _, cartItem ->
            if (productId == cartItem.productId)
                return true
        }
        return false
    }
}

fun checkProductId(){

    //Preparing CartItems
    val cartItem1 = CartItem(1001, 10.6, "Bag")
    val cartItem2 = CartItem(1002, 20.4, "Shoes")

    //Creating CartList
    val cartList = arrayListOf<CartItem>()
    cartList.add(cartItem1)
    cartList.add(cartItem2)

    //Creating Cart

   val cart = Cart(cartList)

    //Finding product
    println("Is 1001 present: " + cart.contains(1001))
    println("Is 1006 present: " + cart.contains(1006))
    
    //OUTPUT
    //Is 1001 present: true 
   //Is 1006 present: false
}

Explanation:
1. We have created a class 'Cart' which will be contain our listOf  'CartItem'.

2. Within our 'Cart' class we have overridden the 'contains' operator which will find whether the productId is within the 'Cart'

3. Finally, we have extension function(hasProductId) on List<CartItem> which returns a Boolean if the productId is present.

Example 3: Comparing two games together.

class GameItem(val scores: Double) {
    operator fun compareTo(item: GameItem): Int = this.scores.compareTo(item.scores)
}

fun compareGame() {

    val gameItem1 = GameItem(100.0)
    val gameItem2 = GameItem(2000.0)

    val result = gameItem1 > gameItem2

    println("Is game1 > game2 ? $result")
    
    //OUTPUT:    //Is game1 > game2 ? false}

Bingo we are done !!!

Let me know if you have any questions in comment box :-)

For more updates follow us on -  Twitter

#codingIsAnArt :-)

Last Updated: December 27, 2017

Tips & tricks android developer should know - part 4

Description: In this post I'm gonna show you some interesting tools from android studio we developers use.

Also check out Part 1,Part 2  and  Part 3.


So let's get started.


1. Layout Inspector: Layout Inspector is an interesting tool to help track view and their respective properties. It contains-

    •    View Tree - contains the hierarchy of the android widgets displaying the full nesting of views.
    •    Properties Table - contains the properties attached to respective view. e.g:layouts/methods/padding and many more.
 a) How to enable it?
        Goto Tools -> Android -> Layout Inspector fig.1 
     
fig.1 Layout Inspector
 Note: Make sure you have android process running for your app and you have active window present to take the screenshot.

 b) How to understand it?(fig.2)

    Left
       - 'View Tree' showing full hierarchy of the screen.
   Center
     - Screenshot of the active window       
   Right
      - 'Properties Table' for each view.
  View Click
    - Properties of the widgets get updated on the right pane i.e 'Properties Table.' and get high Lighted  on the screenshot screen.


fig.2 Layout Inspector

fig.3 Layout Inspector with Properties

RecyclerView:

<RelativeLayout xmlns:android="http://schemas.android.com/apk/res/android"
    xmlns:tools="http://schemas.android.com/tools"
    android:layout_width="match_parent"
    android:layout_height="match_parent"
    android:paddingLeft="@dimen/activity_horizontal_margin"
    android:paddingRight="@dimen/activity_horizontal_margin"
    android:paddingTop="@dimen/activity_vertical_margin"
    android:paddingBottom="@dimen/activity_vertical_margin"
    tools:context=".MainActivity">
    <android.support.v7.widget.RecyclerView
        android:id="@+id/percentList"
        android:layout_width="match_parent"
        android:layout_height="match_parent"
        />
</RelativeLayout>
RecyclerView Item:

<android.support.percent.PercentRelativeLayout
   xmlns:android="http://schemas.android.com/apk/res/android"
    xmlns:app="http://schemas.android.com/apk/res-auto"
    android:layout_width="match_parent"
    android:layout_height="match_parent">
    <TextView
        android:id="@+id/fifty_huntv"
        android:background="#ff7acfff"
        android:text="20% - 50%"
        android:textColor="@android:color/white"
        style="@style/STYLE_PERCENT_TV"
        app:layout_heightPercent="20%"
        app:layout_widthPercent="50%" />
    <TextView
        android:layout_toRightOf="@id/fifty_huntv"
        android:background="#ffff5566"
        android:text="80%-50%"
        style="@style/STYLE_PERCENT_TV"
        app:layout_heightPercent="80%"
        app:layout_widthPercent="50%" />


</android.support.percent.PercentRelativeLayout>


Its an amazing tool to analyse the screen UI for the developers with all the information available on single click. Simply great.


2. How to change DPI of Phone using ADB?

Many times in our development phase we want to check the look of android UI on low/high end devices. Changing the DPI could come handy in such cases.

So let get started.

Steps 1: Find out your phones dpi using below command of adb shell. Search for 'mBaseDisplayInfo='. And then search for density within it.Save it for future to revert our dpi
adb shell dumpsys display

Steps 2: Search for 'mBaseDisplayInfo' and 'density' as show in fig.4


fig.4 Display Density
Step 3: Finally enter below adb command to change the dpi. (fig.5) with 200dpi,420dpi and 600dpi respectively

adb shell wm density 150


Note: If the changes do not reflect you can also try:
adb shell wm density 150 && adb reboot

Thats it, the screen will be reloaded and icons sizes will change to withstand with the density specified in the command.


For more updates follow us on -  
Twitter

Last Updated: August 18, 2017

Switch from Java to Kotlin


Description: In this post I'm gonna show some of the basic syntax and semantics difference while we use "KOTLIN" in your android application w.r.t JAVA(Java v/s KOTLIN).


So let's get started.


1. Variable Declaration
Java:
String name="coderconsole";

Kotlin:
val  name:String="coderconsole"

2. Casting

Java:
WifiManager wifiManager = (WifiManager)context.getSystemService(Context.WIFI_SERVICE);

Kotlin:
val wifiManager = context.getSystemService(Context.WIFI_SERVICE) as WifiManager

3. Function Declaration

Java:

void methodDeclaration(){
    methodDeclaration("First Method ");
}

void methodDeclaration(String firstParam) {
    methodDeclaration(firstParam, "Second Method ");
}

void methodDeclaration(String firstParam, String secondParams) {
    System.out.println(firstParam + secondParams);
}


Kotlin:


fun methodDeclaration(){
    methodDeclaration("First Method ")
}

fun methodDeclaration(name : String){
    methodDeclaration(name, "Second Method ")
}

fun methodDeclaration(first : String, second: String){
    println(first + second)
}


4. Static Functions and Variable

Java:

class DeviceUtils{
    static final String name = "coderconsole";

    public static String getAndroidId(Context context){
        return Settings.Secure.getString(context.getContentResolver(), Settings.Secure.ANDROID_ID);
    }
}


Kotlin:


class DeviceUtils {

    companion object {
        val name: String = "coderconsole"
        @JvmStatic fun getAndroidId(context: Context): String = Settings.Secure.getString(context.contentResolver, Settings.Secure.ANDROID_ID)
   }

}


5. Ternary


Java:
String ternary(String name) {
    return name.equalsIgnoreCase("coderconsole") ? " Ternary success" : " Ternary failed";
}

Kotlin:
fun ternary(name: String): String {
    return if (name.equals("coderconsole"))"Ternary success" else "Ternary failed"
}

6. Operators(this operators are only useful in kotlin)

a) Null Type(?)- variable can be made null only using null type operator

   val array: String = null /** Null cannot be the value of not null type**/ 
   val array: String? = null  /** Bingo! Will work now **/

b) Safe Type:(?.) - Helpful when we donot know when the variable be null.So instead of throwing NPE it return the value as null.

//The below code will return "customerId" if present else return null even if the "customerObject" is null.
fun safeTypeDemo(customerObject: JSONObject?): String?{
         return customerObject?.optString("customerId")     
}

c) Elvis Operator(?:) - Helpful when we want to return some not-null values, if the first result is null.
Java:
int elvisDemo(JSONObject result){
      if (result != null)
        return result.optInt("marks");
     else  return -1;
   }

Kotlin: 
fun elvisDemo(marksObject: JSONObject?): Int {
         return marksObject?.optInt("marks")?:-1      
}
                                 (or)
fun elvisDemo(marksObject: JSONObject?): Int = marksObject?.optInt("marks")?:-1


d) !! operator - throws Null Pointer when asked explicitly
//The below code will throw NullPointerException if customerObject is null.
fun npeTypeDemoDemo(customerObject: JSONObject?): String{
         return customerObject!!.optString("customerId")     
}


7. Loops
a) for loop:
Java
void forLoopDemo(List mList) {
        for (String item : mList)Log.d("Loop", item);
    }

Kotlin
fun forLoopDemo(mList: List) {
       for (item in mList) Log.d("Loop", item)
    }

b) while/do-while: - there is no syntactical difference from Java.

8. Switch Case
Java
void switchCaseDemo(int type) {
    switch (type){
        case 0:
            Log.d("switch", "value - " + type);
            break;
        case 1:
            Log.d("switch", "value - " + type);
            break;
        default:
            Log.d("switch", "value default");
            break;

    }
}

Kotlin
fun switchCaseDemo(type: Int) {
    when (type) {
        0 -> Log.d("switch", "value - " + type)
        1 -> Log.d("switch", "value - " + type)
        else -> Log.d("switch", "value default")
    }
}


9. Extends/Implements

//This sample contains abstract class and an interface to printData.
public abstract class AbstractA {
    public void printAbstractData(String data){
        System.out.println(data);
    }
}
public interface InterfaceA {
    public void printData(String data);
}


public class ExtendsImpDemo extends AbstractA implements InterfaceA {
    @Override    public void printData(String data) {
        printAbstractData(data);
    }
}


Kotlin

abstract class AbstractA{
    public fun printAbstractData(data: String){
        println(data)
    }
}

interface InterfaceA{
    fun printData(data: String)
}

class ExtendsImpDemo : AbstractA(), InterfaceA {
    override fun printData(data: String) {
        printAbstractData(data)
    }
}


10. Iterating JSONArray

Java:
void arrayTest(JSONArray jsonArray) {
    for (int i = 0; i < jsonArray.length(); i++) {
        JSONObject jsonObject = jsonArray.optJSONObject(i);
        Log.d("ArrayTest", jsonObject.optString("name"));
    }
}

Kotlin:
fun arrayTest(jsonArray: JSONArray){
    jsonArray.items<JSONObject>().forEachIndexed { i, jsonObject ->
        Log.d("ArrayTest", jsonObject.optString("name"))
    }
}

Kotlin is an awesome language and very fun to write code in it.
For further reference you can try https://try.kotlinlang.org

For more updates follow us on -  Twitter

Last Updated: January 11, 2017

Introduction to Internet of things platform Octoblu

Description: 

In this post I'm gonna describe very helpful platform for building some stuff that involves 'Internet of thing'/ Internet of apis.
 
So lets get started.


Octoblu - It's an platform to build an amazing iot/iota projects that involve connection of  'things' with variety of tools involved in it. The 'things' could be sensors/led lights/apis from social networks like G+ or twitter etc.


Few key terms
  1. Things - Entity that you need to integrate. E.g: Twitter, G+, Http Api,Sensors etc.
  2. Tools - Connectors to connect the things. E,g: Less than, Greater than operators, Timer.
  3. Flow - Actual Work space which contains THINGS and TOOLS
  4. Bluprints - Final Shared FLOW is Bluprint.
Note: 1. For the sake simplicity we're gonna build a Flow which triggers Twitter post after 5 mins.
          2. DONOT spam your timeline. This may result about your account may get blocked.

Step 1: Create flow

 After successful signup create an Flow and enter name and description as per your choice from  "Flow Inspector" as shown  in fig.1

Flow Inspector
fig.1


Step 2: Add things.

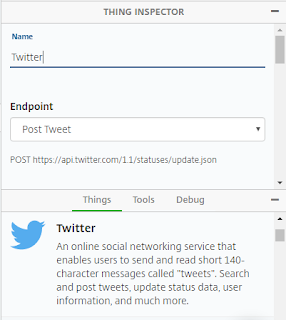
After creating dummy flow its time to add "Things". For our demo we're gonna add "Twitter" as our thing from the Things tab.

Select the endpoint as "Post Tweet" and add a message for post.
Add status as "Hello world"

 As shown in the fig.2.

Note: You can also search through the things and simply drag and drop. You have to add your twitter account for testing.
Coderconsole
fig.2

Step 3: Add trigger.

After adding "Things" its time to add trigger to initiate our twitter post. You can find triggers within the "Tool" tabs as shown in the fig.3

Trigger
fig.3

Step 4: Connection


Now comes the best part "Connections" .Octoblu connections are seamless. We have two points for each "trigger" and "things" simple drag from one point to another as shown in fig4.

Connections
fig.4

Step 5: Lets wrap everything up.


Now simply run the flow created above as shown in fig.5 this will make sure your flow is ready to get triggered

Note: You have to run the flow every time whenever you have made any changes

fig.5


Step 6: Trigger the flow 

Simple click the play icon on the trigger. fig.3. This is trigger your twitter post with the text as "Hello world" on your twitter profile page.

Thats It !!!

How to debug?

This will help to figureout whats happening whenever the trigger  is initiated.

To debug the flow

  1. You have to enabled "DEBUG" mode from "Thing Inspectors" by  first clicking the things on the flow first.

How To Automate?

1. To automate you can use a tool called as "INTERVAL" and can assign the triggering time as 5 minutes


So finally we have automated our twitter post using "Octoblu". It has got immense power and can come handy for demo projects involving 'Internet of things/Internet of APIS'.

For more updates follow us on -  Twitter


Last Updated: October 20, 2016

Tips & tricks android developer should know - part 3

Description: In this post I'm gonna demonstrate some useful tips which we could come handy in our app development life cycle

Also check out Part 1 and Part 2.

So let 's get started.


1. Grant all permissions at once in Marshmallow and above.  

As we know marshmallow compatible apps require permissions. So we normally show permission dialog to the user asking to grant us. That's fine. But every time clicking that 'allow' feels annoying for developers.

So the idea is to allow all the permissions at once without every time clicking the allow button.

Below  shell script will help to make it happen flawlessly.
#!/bin/sh

#add your package_name
PACKAGE=com.app.code2concept

#create array with all the permission you need to enabled    
PKG_ARRAY='android.permission.CALL_PHONE
        android.permission.GET_ACCOUNTS
        android.permission.READ_SMS
        android.permission.READ_CONTACTS
        android.permission.ACCESS_FINE_LOCATION
        android.permission.CAMERA
        android.permission.WRITE_EXTERNAL_STORAGE'

#lets exceute our command
for permissions in $PKG_ARRAY; 
do
 echo $permissions + ' granted'
 adb shell pm grant $PACKAGE $permissions
done

echo 'Bingo its done'
OUTPUT:
$ sh grant_all_permissions.sh
android.permission.CALL_PHONE +  granted
android.permission.GET_ACCOUNTS +  granted
android.permission.READ_SMS +  granted
android.permission.READ_CONTACTS +  granted
android.permission.ACCESS_FINE_LOCATION +  granted
android.permission.CAMERA +  granted
android.permission.WRITE_EXTERNAL_STORAGE +  granted
Bingo its done'

Before


After


2. Battery Historian

Battery historian translate the battery stats into visualization form thereby helping us to figure out whats the cause and how we can optimized our battery usage.

Pre-requisite:
1. 'adb' is configured
2. Devices is detectable using 'adb devices' command
3. Python(2.7)  is install and path is set.

Step 1: Reset the battery stats to fetch fresh info using below
adb shell dumpsys batterystats --reset

Note: Disconnect phone and explore the app for few minutes and connect again

Step 2: Capture 'batterystats' using below command
adb shell dumpsys batterystats > batterystats.txt

Note: The command creates a file name 'batterystats.txt' into the current directory

Step 3: Clone or download the Github repo of 'Battery Historian' from Here. You will find a python script at path '../battery-historian/scripts/historian.py'

Note: You can keep both 'historian.py' and 'batterystats.txt' in the same folder for ease

Step 4: Finally let execute the python script against our 'batterstats.txt' as input as show below
python historian.py batterystats.txt > batterystats.html
This will create 'battertstats.html' fig.1 which we can use to analyse the battery usage as shown HERE.

Historian
fig.1

Last Updated: July 30, 2016

Android Data binding

Description: In this post I'm gonna illustrate concept of 'Data Binding' in android. So straight away.

Let's get started.


'DataBinding' in android was introduced as an effort to coupled the model i.e data directly into the view, thereby eliminating findViewById()  at much larger extend. Although its not limited to this and can help to remove lots of boilerplate code thereby. Its the direct roadway to implement MVVM pattern in our apps.

Prerequisite:

1. Add below snippets into your 'Modulebuild.gradle within 'android' section
    dataBinding {
        enabled true
       }

2. Now just add below line within the your 'Project'  build.gradle within 'dependencies' section.
Note: The gradle plugin should be greater or equals v1.5 +
 classpath 'com.android.tools.build:gradle:1.5.0 

Let's start with simple example of how to eliminate findViewById in activity.

1. Eliminate findViewById();

Step 1: Simply create a model with a field name as 'title' and also the POJO for the same.

public class SingleModel {

    private String title;

    public SingleModel() {
    }

    public String getTitle() {
        return title;
    }

    public void setTitle(String title) {
        this.title = title;
    }
}

Step 2: In our activity_main.xml wrap your parent layout within '<layout> ...< /layout>' . As shown below. Create a <data> ...</data> tag with <variable>...</variable> to access its model variables

   <layout xmlns:android="http://schemas.android.com/apk/res/android">

    <data>
        <variable
            name="single"
            type="com.code2concept.databinding.models.SingleModel"/>
    </data>

    <RelativeLayout
        android:layout_width="match_parent"
        android:layout_height="match_parent">

        <TextView
            android:layout_width="wrap_content"
            android:layout_height="wrap_content"
            android:layout_centerInParent="true"
            android:text="@{single.getTitle()}"/>
    </RelativeLayout>
</layout>

Note: 1. Once you have created a variable into <layout> apt builds the binding file name BR.java(similar concept what R.java doeswhich and other binding functions.

Step 3: Lets integrate in our MainActivity. 

public class MainActivity extends AppCompatActivity {

    @Override
    protected void onCreate(Bundle savedInstanceState) {
        super.onCreate(savedInstanceState);
        ActivityMainBinding mainActivity = DataBindingUtil.setContentView(this, R.layout.activity_main);

        SingleModel singleModel = new SingleModel();
        singleModel.setTitle("Wow ! Data binding is awesome");
        mainActivity.setVariable(BR.single, singleModel);

    }
}

Bingo ! we have integrated databinding in our app


2. Handle click.

Step 1: Create a <variable> ... </variable> tag with name and type as shown below.

Note: Type can be created from separate class as well. We're gonna implement onClick in Activity.

<layout xmlns:android="http://schemas.android.com/apk/res/android">
    <data>
        <variable
            name="single"
            type="com.code2concept.databinding.models.SingleModel"/>

        <variable
            name="singleClick"
            type="com.code2concept.databinding.MainActivity"/>

    <RelativeLayout
        android:layout_width="match_parent"
        android:layout_height="match_parent">
        <TextView
            android:layout_width="wrap_content"
            android:layout_height="wrap_content"
            android:layout_centerInParent="true"
            android:onClick="@{singleClick.onClick}"
            android:text="@{single.getTitle()}"/>
    </RelativeLayout>
</layout>


Step 2: Finally bind the singleClick to the activity as shown below.
public class MainActivity extends AppCompatActivity implements View.OnClickListener {

    @Override
    protected void onCreate(Bundle savedInstanceState) {
        super.onCreate(savedInstanceState);
        ActivityMainBinding mainActivity = DataBindingUtil.setContentView(this, R.layout.activity_main);

        SingleModel singleModel = new SingleModel();
        singleModel.setTitle("Wow ! Data binding is awesome");
        mainActivity.setVariable(com.code2concept.databinding.BR.single, singleModel);

        //bind click to the  activity
        mainActivity.setSingleClick(this);
    }

    @Override
    public void onClick(View view) {
        Toast.makeText(this, "Single Model view is clicked", Toast.LENGTH_SHORT).show();
    }
}

Great, we have handled onClick event as well

Question: what happens when the content of the view need to be changed in the runtime?.
No need to worry 'DataBinding' helps us effortlessly.


3. NotifyChangeProperty

Step1: Add @Bindable annotation to the getters and notifyPropertyChanged() to the setters as shown below.

public class SingleModel extends BaseObservable {

    private String title;


    @Bindable
    public String getTitle() {
        return title;
    }

    public void setTitle(String title) {
        this.title = title;
        notifyPropertyChanged(BR.title);
    }
}

Step 2: Finally lets change our title on onClick. fig.1

public class MainActivity extends AppCompatActivity implements View.OnClickListener {

    private SingleModel singleModel;
    private ActivityMainBinding mainActivity;

    @Override
    protected void onCreate(Bundle savedInstanceState) {
        super.onCreate(savedInstanceState);
        mainActivity = DataBindingUtil.setContentView(this, R.layout.activity_main);

        singleModel = new SingleModel();
        singleModel.setTitle("Wow ! Data binding is awesome");
        mainActivity.setVariable(BR.singleModel, singleModel);

        //bind click to the  activity
        mainActivity.setSingleClick(this);
    }

    @Override
    public void onClick(View view) {
        singleModel.setTitle("Title is changes successfully");
    }
}

databinding
fig.1

Awesome, finally we have integrated databinding in our project ;-). Part 2 coming soon