Last Updated: December 19, 2015

Android Studio Flavors Demo

Description: In this post I'm gonna explain and show you guys how to use flavors in android studio.

Android Studio's flavors help as totally avoid chaos in code by separating our release code setup and staging code setup or by creating free/premium version for the same code base.

Really awesome :-)

Lets get started by creating two flavors for our project i.e prod and stag and find how it actually works!!!

Here we goo.


Step 1: Add productFlavors in your  app's build.gradle  within android section.

productFlavors{
    prodFlavors{

    }

    stageFlavors{

    }
}

*Just sync the gradle or rebuild the project you will find variants for two flavors in "Build Variants"(fig.1)


                                      (fig.1)


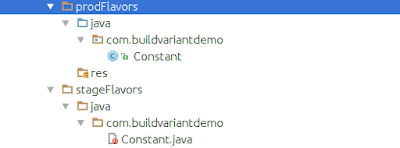
Step 2: Now let's create the folder structure for flavors to use prod and stage flavors similar to the structure of the main.


(Here we have created the folder structure same as the main i.e containing java and res folders respectively)
(fig.2)


Step 3: Lets add a constant file containing our dummy values.Thus we can easily switch the build variant & our constants values get changed as per the build variant selected.

Note: Always change the "Build Variant" when ever you want to change any thing within the flavors code base. (as shown in fig.1)


                                   (fig.3)

Step 4: Bingo !!!Final code and output.

In production flavor:
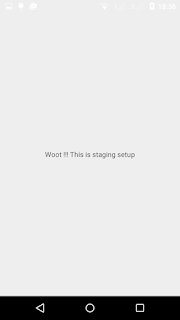
public class Constant {
    public static final String FLAVOUR_ID = "Woot !!! This is production setup";
}


In staging flavor
public class Constant {
    public static final String FLAVOUR_ID = "Woot !!! This is staging setup";
}


MainActivity:

public class MainActivity extends AppCompatActivity {

    @Override    protected void onCreate(Bundle savedInstanceState) {
        super.onCreate(savedInstanceState);
        setContentView(R.layout.activity_main);

        //This is where by just changing by build variant we can change our setup easily
        TextView flavourType = (TextView)findViewById(R.id.flavourType);
        flavourType.setText(Constant.FLAVOUR_ID);

    }
}

How to change configuration of the build as per the variant? - (listed below)

productFlavors{

    prodFlavors{
        applicationId "com.buildvariant.prod"
        minSdkVersion 10
        targetSdkVersion 23
        versionCode 2
        versionName "1.1"
 
}

    stageFlavors{
        applicationId "com.buildvariant.stage"
        minSdkVersion 10
        targetSdkVersion 23
        versionCode 2
        versionName "1.1"
    }
}

Thus we can change our project setup thereby avoiding unnecessary chaos by separating our production setup code against staging.

Awesome!!!Android.

Output:


Last Updated: October 21, 2015

Android support v7 palette demo

Description: In this post I'm gonna show you how to use android's support library v7 palette for extracting color from bitmap. Its can have variety of use-cases like making the background of the profile image somewhat similar to profile image or changing the whole UI as per the bitmap into the screen. Really Awesome !!!

Github project here

Lets get started.


Step 1: Add this into build.gradle.

compile 'com.android.support:palette-v7:+'


Step 2: Pass the bitmap into palette to get List<Palette.Swatch> as shown below.

Palette.from(bitmap).generate(new Palette.PaletteAsyncListener() {
    @Override    public void onGenerated(Palette palette) {
        swatchesList = palette.getSwatches();

        }
    }
});


Step 3: Here we have used CountDownTimer to display the RGB of the bitmap into the background of parent layout after the interval of 1sec. As shown below

mainContainer.setBackground(AppUtils.createGradient(swatch.getRgb()));


Steps 4: Lets combine everything :-)


public class MainActivity extends AppCompatActivity implements INotifyTimer {

    private static final String TAG = MainActivity.class.getName();

    private List<Palette.Swatch> swatchesList;
    private CountDownTimerPalette countDownTimer;

    private int size ;

    private RelativeLayout mainContainer;
    private ImageView circularImageView;

    @Override    protected void onCreate(Bundle savedInstanceState) {
        requestWindowFeature(Window.FEATURE_NO_TITLE);
        super.onCreate(savedInstanceState);
        setContentView(R.layout.activity_main);

        init();

        extractColorFromBitmap();
    }

    private void init() {
        mainContainer = (RelativeLayout)findViewById(R.id.mainContainer);
        circularImageView = (ImageView)findViewById(R.id.circularImageView);
    }

    private void extractColorFromBitmap() {

        Bitmap bitmap = AppUtils.getCircleBitmap(BitmapFactory.decodeResource(MainActivity.this.getResources(), R.mipmap.capture_palette));
        circularImageView.setImageBitmap(bitmap);

        Palette.from(bitmap).generate(new Palette.PaletteAsyncListener() {
            @Override            public void onGenerated(Palette palette) {
                swatchesList = palette.getSwatches();

                if (swatchesList != null && swatchesList.size() > 0) {
                    countDownTimer = new CountDownTimerPalette(1000 * swatchesList.size(), 1000, MainActivity.this);
                    countDownTimer.start();
                }
            }
        });
    }

    @Override    public void onTick(int tick) {

        Palette.Swatch swatch = swatchesList.get(tick - 1);
        if (Build.VERSION.SDK_INT >= Build.VERSION_CODES.JELLY_BEAN) {
            mainContainer.setBackground(AppUtils.createGradient(swatch.getRgb()));
        }else {
            mainContainer.setBackgroundDrawable(AppUtils.createGradient(swatch.getRgb()));
        }

    }

    @Override    public void onFinish() {
        countDownTimer.start();
    }


    @Override    protected void onDestroy() {
        super.onDestroy();

        if (countDownTimer != null){
            countDownTimer.cancel();
        }
    }

}


Output:


Last Updated: October 14, 2015

Android Multiple row layout using RecyclerView

Description: In this post I'm gonna show you how we can have multiple row layout in Android's Material Design  RecyclerView  using   getItemViewType.

compile 'com.android.support:cardview-v7:23.0.0'
compile 'com.android.support:recyclerview-v7:23.0.0'

GitHub Project HERE

So lets get started :-)


Step 1:
Create Recycler Adapter by overriding getItemViewType method and giving the type for different layout as shown below.


@Override

public int getItemViewType(int position) {

    MultipleRowModel multipleRowModel = multipleRowModelList.get(position);

    if (multipleRowModel != null)
        return multipleRowMod.type;

    return super.getItemViewType(position);
}
Step 2: Create a viewHolder as per viewType .  We can create different row layout using viewType .

Note: viewType in onCreateviewholder is retured from getItemViewType in Step 1.
@Override
public MultipleRowViewHolder onCreateViewHolder(ViewGroup parent, int viewType) {

    View view = null;

    if (viewType == AppConstant.FIRST_ROW)
        view = inflater.inflate(R.layout.view_row_first, parent, false);
    else if (viewType == AppConstant.OTHER_ROW)
        view = inflater.inflate(R.layout.view_row_other, parent, false);

    return new MultipleRowViewHolder(view, viewType);
}

Step 3: Lets integrated all this in one RecyclerView adapter.

public class MultipleRowAdapter extends RecyclerView.Adapter<MultipleRowViewHolder> {

    private LayoutInflater inflater = null;
    private List<MultipleRowModel> multipleRowModelList;

    public MultipleRowAdapter(Context context, List<MultipleRowModel> multipleRowModelList){
        this.multipleRowModelList = multipleRowModelList;
        inflater = LayoutInflater.from(context);
    }

    @Override
    public MultipleRowViewHolder onCreateViewHolder(ViewGroup parent, int viewType) {

        View view = null;

        if (viewType == AppConstant.FIRST_ROW)
            view = inflater.inflate(R.layout.view_row_first, parent, false);
        else if (viewType == AppConstant.OTHER_ROW)
            view = inflater.inflate(R.layout.view_row_other, parent, false);

        return new MultipleRowViewHolder(view, viewType);
    }

    @Override
    public void onBindViewHolder(MultipleRowViewHolder holder, int position) {
        holder.multipleContent.setText(multipleRowModelList.get(position).modelContent);
    }

    @Override
    public int getItemCount() {
        return (multipleRowModelList!= null && multipleRowModelList.size() > 0 ) ? multipleRowModelList.size() : 0;
    }

    @Override
    public int getItemViewType(int position) {

        MultipleRowModel multipleRowModel = multipleRowModelList.get(position);

        if (multipleRowModel != null)
            return multipleRowModel.type;

        return super.getItemViewType(position);
    }

}


Step 4: Finally our MainActivity looks something like this.

public class MainActivity extends AppCompatActivity {

    private RecyclerView multipleRowRecyclerView;
    private MultipleRowAdapter multipleRowAdapter;

    private List<MultipleRowModel> multipleRowModelList = new ArrayList<>();

    @Override

    protected void onCreate(Bundle savedInstanceState) {
        super.onCreate(savedInstanceState);
        setContentView(R.layout.activity_main);

        multipleRowRecyclerView = (RecyclerView)findViewById(R.id.multipleRowRecyclerView);
        multipleRowRecyclerView.setHasFixedSize(true);

        LinearLayoutManager linearLayoutManager = new LinearLayoutManager(this, OrientationHelper.VERTICAL, false);
        multipleRowRecyclerView.setLayoutManager(linearLayoutManager);
        multipleRowRecyclerView.setItemAnimator(new DefaultItemAnimator());

        fillAdapter();

        multipleRowAdapter = new MultipleRowAdapter(MainActivity.this, multipleRowModelList);

        multipleRowRecyclerView.setAdapter(multipleRowAdapter);
    }

    private void fillAdapter() {

        int type;

        String content;

        for (int i = 0; i < 10; i++) {

            if (i == 0 || i == 5 || i == 9) {
                type = AppConstant.FIRST_ROW;
                content = "Type 1: This is Multiple row layout";
            } else {
                type = AppConstant.OTHER_ROW;
                content = "Type 2";
            }

            multipleRowModelList.add(new MultipleRowModel(type , content));
        }
    }
}


GitHub Project HERE

Sample Output :


Last Updated: August 30, 2015

Android percent support lib sample

Update: 

From API Level 26, percent support library is deprecated. Please use updated code and samples from Github project.

GitHub project HERE

In this post I'm gonna show you guys a demo of percent layout of android from support library. Since many a time in our awesome RelativeLayout we insert LinearLayout just to get the property of layout_weight for accessing.

Now android has a new support library to remove this dependencies.

Before beginning some pre-requestic (at the time for development):

  • Android SDK v22
  • Android Build Tools v22.0.1
  • Android Percent Support Repository v23.0.0
  • Android Support appcompat-v7:22.2.1
So let's get started:


Step 1: Add below line into apps build.gradle.

compile 'com.android.support:percent:23.0.0'

Step 2:  Add any one of below as the parent of the layout.Its similar to our RelativeLayout or FrameLayout.

<android.support.percent.PercentRelativeLayout> 
or
<android.support.percent.PercentFrameLayout>

Step 3: Now we gonna use layout_heightPercent and layout_widthPercent  property's to specify our height and width in percentage.

Consider this simple layout.

percent_layout.xml


Lets make it :-)


<android.support.percent.PercentRelativeLayout
    xmlns:android="http://schemas.android.com/apk/res/android"
    xmlns:app="http://schemas.android.com/apk/res-auto"
    android:layout_width="match_parent"
    android:layout_height="match_parent">
    <TextView
        android:id="@+id/fifty_fifty_tv"
        android:layout_width="0dp"
        android:layout_height="0dp"
        android:layout_gravity="center_horizontal"
        android:background="#ffff8800"
        android:text="50% - 50%"
        android:textColor="@android:color/white"
        android:textSize="25sp"
        app:layout_heightPercent="50%"
        app:layout_widthPercent="50%"
         />
    <TextView
        android:id="@+id/twenty_fifty_tv"
        android:layout_width="0dp"
        android:layout_height="0dp"
        android:layout_gravity="center_horizontal"
        android:layout_toRightOf="@id/fifty_fifty_tv"
        android:background="#ffff5566"
        android:text="20%-50%"
        android:textSize="25sp"
        app:layout_heightPercent="20%"
        app:layout_widthPercent="50%"
        />

    <TextView
        android:id="@+id/thirty_fifty_tv"
        android:layout_width="0dp"
        android:layout_height="0dp"
        android:layout_below="@id/twenty_fifty_tv"
        android:layout_gravity="center_horizontal"
        android:layout_toRightOf="@id/fifty_fifty_tv"
        android:background="#aa3628cc"
        android:text="30%-50%"
        android:textSize="25sp"
        app:layout_heightPercent="30%"
        app:layout_widthPercent="50%"
        />
    <TextView
        android:id="@+id/century_50_tv"
        android:layout_width="0dp"
        android:layout_height="0dp"
        android:layout_below="@id/fifty_fifty_tv"
        android:layout_gravity="center_horizontal"
        android:background="#aacacc46"
        android:text="50%-100%"
        android:textSize="25sp"
        app:layout_heightPercent="50%"
        app:layout_widthPercent="100%"
        />
</android.support.percent.PercentRelativeLayout>


Thus by using the android percent support library we have made our layout simple by removing boilerplate layout.

GitHub project HERE

Really awesome :-)

Last Updated: July 28, 2015

Android InstrumentationTestCase for Network call Demo.

Description: In this post I'm gonna show you how we can create a testcase for our network calls using android InstrumentationTestCase I'm gonna use CoutDownLatch simply becausein most of our app we make network call on background thread. CountDownLatch gives as option to run call single threaded.

So lets get started. :-)


Step 1: Create a class NetworkCallTest extends InstrumentationTestCase within your 'app/src/androidTest/java/<package_name>


Step2: Create any method within the class prefixed as test e.g: testNetworkCall. For serial exceution you can have name as test1,test2,test3 and so on.

Note: test case are event driven if methods are not prefixed with test its not gonna execute.
public void testNetworkCall(){}


Step3: Lets create  a dummy network call for demo using aquery and countdown latch.
public class NetworkCallTest extends InstrumentationTestCase {

    @Override
    public void setUp() throws Exception {
        super.setUp();
    }

    public void testNetworkCall(){
        CountDownLatch countDownLatch = new CountDownLatch(1);
        new Thread(new NetworkRunnable(countDownLatch)).start();
    }

    private class NetworkRunnable implements Runnable {

        private CountDownLatch countDownLatch;

        public NetworkRunnable(CountDownLatch countDownLatch) {
            this.countDownLatch = countDownLatch;
        }

        @Override
        public void run() {

            AQuery aQuery = new AQuery(getInstrumentation().getContext());
            aQuery.ajax( "http://jsonplaceholder.typicode.com/posts" , JSONArray.class , new AjaxCallback<JSONArray>(){
                @Override
                public void callback(String url, JSONArray jsonArray, AjaxStatus status) {

                    assertNotNull("response array  is null", jsonArray);

                    for (int i = 0; i < jsonArray.length(); i++) {

                        JSONObject object = jsonArray.optJSONObject(i);

                        assertNotNull("jsonObject is null", object);

                        String userId = object.optString("userId");
                        assertTrue("User Id is empty" , !TextUtils.isEmpty(userId));

                        String id = object.optString("id");
                        assertTrue("Id is empty" , !TextUtils.isEmpty(id));

                        String title = object.optString("title");
                        assertTrue("title is empty" , !TextUtils.isEmpty(title));

                        String body = object.optString("body");
                        assertTrue("body is empty" , !TextUtils.isEmpty(body));
                    }

                    countDownLatch.countDown();


                }
            });
        }
    }
}


Step4:Run the test case . Click to know HOW TO RUN TESTCASES ?.


Android How to run Instrumentation testCases ?

Description: In this post I'm gonna show you how we can run the test case in android.I have posted snapshot of each step and how we can filter the testcase based on class -methods respectively.

So lets get started.


Step 1: Open Edit Configuration from Run menu of android studio.


Step 2: Create new Configuration by clicking icon + and select new Android Tests.


Step 3: Select module.You can also select different testType like class,package,method or module.


Step 4: Apply n save.Now you have saved the configuration.You testcase configuration is ready!!!

Note: You can now also right the particular testcase and run it direclty after configuration.


Last Updated: June 14, 2015

SeekBar Swipe Control

Description:

In this post I'm gonna show you How you can control your seekbar( horizontal + vertical ) using the android GestureDetector.In this technique you can move your seekbar progress on screen's swipe up,down,left right movement using simple callbacks.


So let's get stared :


Step1: Add a Gesture Detector to calculate the screen's swipe(left,right,top,down).

private final class GestureListener extends GestureDetector.SimpleOnGestureListener {

        private static final int SWIPE_THRESHOLD = 10;
        private static final int SWIPE_VELOCITY_THRESHOLD = 10;

        @Override
        public boolean onScroll(MotionEvent e1, MotionEvent e2, float distanceX, float distanceY) {
            boolean result = float diffY = e2.getY() - e1.getY();
                float diffX = e2.getX() - e1.getX();
                if (Math.abs(diffX) > Math.abs(diffY)) {
                    if (Math.abs(diffX) > SWIPE_THRESHOLD && Math.abs(distanceX) > SWIPE_VELOCITY_THRESHOLD) {
                        if (diffX > 0) {
                            iSwipeRefresh.rightSwipe();
                            return true;
                        } else {
                            iSwipeRefresh.leftSwipe();
                            return true;

                        }
                    }
                } else {
                    if (Math.abs(diffY) > SWIPE_THRESHOLD && Math.abs(distanceY) > SWIPE_VELOCITY_THRESHOLD) {
                        if (diffY > 0) {

                            iSwipeRefresh.downSwipe();
                            return true;
                        } else {
                            iSwipeRefresh.upSwipe();
                            return true;
                        }
                    }
                }
            } catch (Exception exception) {
                exception.printStackTrace();
            }
            return result;
        }


        @Override
        public boolean onDown(MotionEvent e) {
            return true;
        }

        @Override
        public boolean onFling(MotionEvent e1, MotionEvent e2, float velocityX, float velocityY) {
            return true;
        }
    }
Step 2: Create a interface to receive the callback.

public interface ISwipeRefresh {

    void leftSwipe();

    void rightSwipe();

    void upSwipe();

    void downSwipe();
}
Step 3: Add the above Gesture detector in a class implementing onTouchListener.

public class OnScrollTouchListenerControl implements View.OnTouchListener {

    private static final String TAG = OnScrollTouchListenerControl.class.getName();
    private final GestureDetector gestureDetector;
    private ISwipeRefresh iSwipeRefresh;

    public OnScrollTouchListenerControl(Context ctx, ISwipeRefresh iSwipeRefresh) {
        this.iSwipeRefresh = iSwipeRefresh;
        gestureDetector = new GestureDetector(ctx, new GestureListener());
    }

    public boolean onTouch(final View view, final MotionEvent motionEvent) {
        return gestureDetector.onTouchEvent(motionEvent);
    }
 }


Step:4 Finally lets integrate with this Seekbar.


public class MainActivity extends Activity implements ISwipeRefresh ,SeekBar.OnSeekBarChangeListener {

    private final static String TAG = MainActivity.class.getName();
    private SeekBar horizontalSeekB;
    private int MIN_PROGRESS = 10;

    @Override
    protected void onCreate(Bundle savedInstanceState) {
        super.onCreate(savedInstanceState);
        setContentView(R.layout.activity_main);

        init();
    }

    private void init() {

        findViewById(R.id.mainContainer).setOnTouchListener(new OnScrollTouchListenerControl(this, this));
        horizontalSeekB     = (SeekBar)findViewById(R.id.horizontalSeekBar);
        horizontalSeekB.setMax(100);
        horizontalSeekB.setOnSeekBarChangeListener(this);
    }

    @Override
    public void leftSwipe() {
        horizontalSeekB.setProgress(horizontalSeekB.getProgress() - MIN_PROGRESS);
    }

    @Override
    public void rightSwipe() {
        horizontalSeekB.setProgress(horizontalSeekB.getProgress() + MIN_PROGRESS);
    }

    @Override
    public void upSwipe() {
        //verticalSeekbarB.setProgress(verticalSeekbarB.getProgress() - MIN_PROGRESS);
    }

    @Override
    public void downSwipe() {
        //verticalSeekbarB.setProgress(verticalSeekbarB.getProgress() + MIN_PROGRESS);
    }

    @Override
    public void onProgressChanged(SeekBar seekBar, int progress, boolean fromUser) {}

    @Override
    public void onStartTrackingTouch(SeekBar seekBar) {}

    @Override
    public void onStopTrackingTouch(SeekBar seekBar) {}
}


GITHUB Project HERE

Bingo we're DONE!!!


Last Updated: May 26, 2015

Lollipop SwipeRefreshLayout with loader


Description: In this post I'm gonna show you how to use Lollipop's SwipeRefreshLayout using loader in android.It demostrate use of swipe refresh with loader's restartloader() method.

Github project for the same here


Step 1: Add the dependency in build.gradle
dependencies {
    compile 'com.android.support:appcompat-v7:21.0.2' // or your updated version
}
Step 2: Create Layout to use swipeRefreshLayout.It can be wrap over Scrollview or ListView.

<?xml version="1.0" encoding="utf-8"?>
<android.support.v4.widget.SwipeRefreshLayout
    xmlns:android="http://schemas.android.com/apk/res/android"
    android:id="@+id/swipe_container"
    android:layout_width="match_parent"
    android:layout_height="match_parent">

    <ListView
        android:id="@+id/video_listView"
        android:layout_width="match_parent"
        android:smoothScrollbar="true"
        android:layout_height="match_parent" />

</android.support.v4.widget.SwipeRefreshLayout>


Step 3:Finally lets wrap everthing in code.

Note: Here loader is used  to fetch the videos names from phone and a swipeRefreshLayout functionality is added to update the content.

public class MainActivity extends FragmentActivity implements  LoaderManager.LoaderCallbacks<Cursor>  ,SwipeRefreshLayout.OnRefreshListener {

    private static final int LOADER_ID = 100;
    private ListView videoList;
    private SwipeRefreshLayout swipeContainer;
    private Context context;
    private SwipeAdapter swipeListAdapter;
    private String TAG = MainActivity.class.getName();

    @Override
    protected void onCreate(Bundle savedInstanceState) {
        super.onCreate(savedInstanceState);
        setContentView(R.layout.activity_main);

        context         = MainActivity.this;
        videoList       = (ListView) findViewById(R.id.video_listView);
        swipeContainer  = (SwipeRefreshLayout) findViewById(R.id.swipe_container);


        swipeContainer.setColorSchemeResources(
                R.color.swiperedcolor,
                R.color.swipegreencolor,
                R.color.swipeyellowcolor,
                R.color.swipebluecolor);


        swipeListAdapter = new SwipeAdapter(context , null  , 0);
        videoList.setAdapter(swipeListAdapter);


        swipeContainer.setOnRefreshListener(this);

        getSupportLoaderManager().initLoader(LOADER_ID, null, this);

    }


    @Override
    public Loader<Cursor> onCreateLoader(int i, Bundle bundle) {
        Log.d(TAG , "||onCreateLoader called||");
        return new CursorLoader(context ,MediaStore.Video.Media.EXTERNAL_CONTENT_URI ,null , null , null , MediaStore.Video.Media.TITLE + " collate nocase ");
    }


    @Override
    public void onLoadFinished(Loader<Cursor> cursorLoader, Cursor cursor) {
        if (swipeListAdapter != null && cursorLoader != null){

            Log.d(TAG , "||onLoadFinished called||");

            swipeListAdapter.swapCursor(cursor);

            swipeContainer.post(new Runnable() {
                @Override
                public void run() {
                    swipeContainer.setRefreshing(false);
                }
            });
        }
    }

    @Override
    public void onLoaderReset(Loader<Cursor> cursorLoader) {
        if (swipeListAdapter != null) {
            Log.d(TAG , "||onLoaderReset called||");
            swipeListAdapter.swapCursor(null);
        }
    }


    /**
     * Whenever swipe refresh starts we get callback here.Here we can place our logic.
     */
    @Override
    public void onRefresh() {
        Log.d(TAG , "||onRefresh called||");
        getSupportLoaderManager().restartLoader(LOADER_ID , null ,this);
    }


    private class SwipeAdapter extends CursorAdapter{


        private VideoViewHolder videoViewHolder;

        public SwipeAdapter(Context context, Cursor c, int flags) {
            super(context, c, flags);
        }

        @Override
        public View newView(Context context, Cursor cursor, ViewGroup parent) {

            videoViewHolder = new VideoViewHolder();
            View convertView = LayoutInflater.from(context).inflate(R.layout.row_swipe_refresh , parent , false);
            videoViewHolder.videoTitleTextView = (TextView) convertView.findViewById(R.id.titleTv);

            convertView.setTag(videoViewHolder);

            return convertView;
        }

        @Override
        public void bindView(View view, Context context, Cursor cursor) {

            videoViewHolder = (VideoViewHolder) view.getTag();
            videoViewHolder.videoTitleTextView.setText(cursor.getString(cursor.getColumnIndexOrThrow(MediaStore.Video.Media.TITLE)));

        }
    }


    private class VideoViewHolder {
        private TextView videoTitleTextView;
    }
}


Result:(Displays the names of videos in phone using loader)


Last Updated: March 08, 2015

Android Seekbar Scrubber

Description:

In this article I'm gonna show you scrubber seek bar demo with drawable in android.
It include a layer-list with background and progress properties of seek bar.Thats it!!!

Scrubber Seek bar

Lets get started!!!

Step 1:Create a drawable scrubber_layer_list.xml

 <?xml version="1.0" encoding="utf-8"?>  
 <layer-list xmlns:android="http://schemas.android.com/apk/res/android">  
   <item android:id="@android:id/background">  
     <shape android:shape="rectangle">  
       <size android:height="5dp"/>  
       <solid android:color="#ffc6c8cc"/>  
       <stroke android:color="#000000" android:width="1dp"/>  
     </shape>  
     </item>  
   <item android:id="@android:id/progress">  
     <clip>  
       <shape android:shape="rectangle">  
         <size android:height="5dp"/>  
         <solid android:color="#ff7092cc"/>  
         <stroke android:color="#000000" android:width="1dp"/>  
       </shape>  
     </clip>  
   </item>  
 </layer-list>  

The above drawable is used to create the background and progress of seek bar using layer-list..


Step 2: Create a simple layout(activity_main) containing seekbar and textView.

 <RelativeLayout xmlns:android="http://schemas.android.com/apk/res/android"  
   xmlns:tools="http://schemas.android.com/tools"  
   android:layout_width="match_parent"  
   android:layout_height="match_parent"  
   android:paddingLeft="@dimen/activity_horizontal_margin"  
   android:paddingRight="@dimen/activity_horizontal_margin"  
   android:paddingTop="@dimen/activity_vertical_margin"  
   android:paddingBottom="@dimen/activity_vertical_margin"  
   tools:context=".MainActivity">  
   <SeekBar  
     android:max="100"  
     android:progress="0"  
     android:thumb="@null"  
     android:progressDrawable="@drawable/scrubber_layer_list"  
     android:layout_centerInParent="true"  
     android:layout_width="match_parent"  
     android:layout_height="wrap_content"  
     android:id="@+id/seekBar"/>  
   <TextView  
     android:id="@+id/scrubber_update_tv"  
     android:layout_below="@id/seekBar"  
     android:layout_centerInParent="true"  
     android:layout_marginTop="10dp"  
     android:textStyle="bold"  
     android:textSize="16sp"  
     android:text="0%"  
     android:layout_width="wrap_content"  
     android:layout_height="wrap_content" />  
 </RelativeLayout>  


Step 3: Finally add listener to witness the seek percentage.


 public class MainActivity extends ActionBarActivity {  
   private TextView scrubberTv;  
   private SeekBar seekBar;  
   @Override  
   protected void onCreate(Bundle savedInstanceState) {  
     super.onCreate(savedInstanceState);  
     setContentView(R.layout.activity_main);  
     scrubberTv = (TextView) findViewById(R.id.scrubber_update_tv);  
     seekBar = (SeekBar) findViewById(R.id.seekBar);  
     seekBar.setOnSeekBarChangeListener(new SeekBar.OnSeekBarChangeListener() {  
       @Override  
       public void onProgr --Cha!-- (SeekBar seekBar, int i, boolean b) {  
         scrubberTv.setText("" + i +  --);  
       }  
       @Override  
       public void onStartTrackingTouch(SeekBar seekBar) {  
       }  
       @Override  
       public void onStopTrackingTouch(!-- Bar seekBar) {  
       }  
     });  
   }  
 }  

Output: