Last Updated: October 30, 2019

Things every android developer should know - part 5

Description: Hello coders! In this post I'm gonna show some interesting tips and tricks you can start using in your android project.

Also check out Part 1,Part 2Part 3 and Part 4

So let's get started.

1. How to remove boiler plate code of  Parcelable interface?

Let's consider this class with Parcelable Interface implementation. This class contains overriden methods which are boiler plate at larger extends

class User(val id: String, val name: String, val age: Long, val address: String, val isPrime: Boolean, val contact: String) : Parcelable {
    constructor(parcel: Parcel) : this(
            parcel.readString(),
            parcel.readString(),
            parcel.readLong(),
            parcel.readString(),
            parcel.readByte() != 0.toByte(),
            parcel.readString())

    override fun writeToParcel(parcel: Parcel, flags: Int) {
        parcel.writeString(id)
        parcel.writeString(name)
        parcel.writeLong(age)
        parcel.writeString(address)
        parcel.writeByte(if (isPrime) 1 else 0)
        parcel.writeString(contact)
    }

    override fun describeContents(): Int = 0

    companion object CREATOR : Parcelable.Creator {
        override fun createFromParcel(parcel: Parcel): User {
            return User(parcel)
        }

        override fun newArray(size: Int): Array {
            return arrayOfNulls(size)
        }
    }

}

So here comes @Parcelize annotation into picture. Lets modify our User class using @Parcelize
@Parcelize
class User(val id: String, val name: String, val age: Long, val address: String, 
           val isPrime: Boolean, val contact: String) : Parcelable

@Parcelize is the part of androidExtensions we have to enable it by adding below snippets within module's build.gradle section.
android {
    ...
    androidExtensions {
        experimental true
    }
    ...
}

2. Using Plurals

Although plurals where introduced long time back, but have seen developers adding logics for plural strings. Let's take an example of adding plural, when any post is liked.
    <plurals> name="like_count">
        <item quantity="one">%d second ago</item>
        <item quantity="other">%d seconds ago</item>
    </plurals>


Access within the code
mContext.resources.getQuantityString(R.plurals.like_count, 1, 2)

#Output:
2 second ago

#Note: First argument matches the plural and second is the argument for %d 

3. How to Change Default layout of activity?


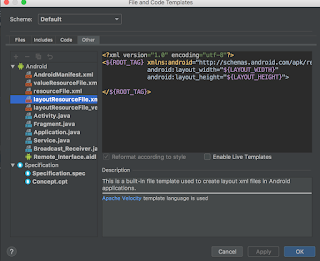
Its interesting because it will help to add some constant template(toolbar in all the activity etc ) which we normally add after the activity is created, henceforth saving time. Simply Go to File -> New -> Edit File Templates
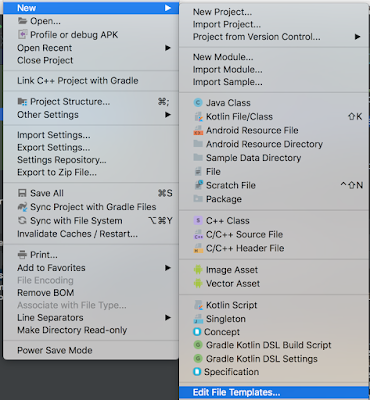

Edit Templates
Edit Templates

Change Default Tag of any layout.xml
Changing Root Tag for layouts

In the above example we can simply replace  ROOT_TAG with <LinearLayout> and next time when we create new layout it will start with <LinearLayout>


Bingo we're done.

For more updates follow us on -  Twitter

#codingIsAnArt
#coderconsole

Last Updated: June 19, 2019

How to create docker image with NodeJs and Grunt?

Description: In this post I'm gonna show you how to create Docker Image for Nodejs project using Grunt

Note:
Grunt:  Its a Javascript task runner. In this project we'll use for minification of our .js file.
Docker:  Its a platform where we gonna place containerised image of our NodeJs Project.

Github Project

So lets get started.

Step 1:  Create index.js

//Import Express
var express = require('express')
var app = express()

//Import Path
var path = require('path')

//Mounting our .js from build folder.
app.use("/build", express.static(__dirname + "/build"))

//Capture the base url
app.get('/', function(req, res){
 res.sendFile(__dirname + "/index.html")
})

//Listen on port 9000
app.listen(9000, function(){
 console.log('Lisening on port 9000')
})

Note: build folder will be created after we run our Gruntfile

Step 2:  Create package.json

{
  "name": "demo-docker-nodejs-grunt",
  "version": "1.0.0",
  "description": "",
  "main": "index.js",
  "scripts": {
    "build": "grunt uglify",
    "start": "node index.js"
  },
  "author": "coderconsole",
  "license": "ISC",
  "dependencies": {
    "express": "^4.17.1",
    "grunt": "^1.0.4",
    "grunt-cli": "^1.3.2",
    "grunt-contrib-uglify": "^4.0.1"
  }
}


Note: 
dependencies: Its contains all the dependencies we needed within the project.
scripts: Its contains grunt uglify to minify our .js and and start to start the nodejs app.

Step 3:  Create Gruntfile.js parallel to package.json and echo.js within src/ folder(just to separate our code structure)

Gruntfile.js
//Setting grunt
module.exports = function(grunt){

    //Setting Init Config from package.json
    grunt.initConfig({

        //Read package.json and assign it to 'pkg'
        pkg: grunt.file.readJSON('package.json'),


        uglify: {
              options: {
                banner: '/*! <%= pkg.name %> <%= grunt.template.today("yyyy-mm-dd") %> */\n'
              },
              build: {
                src: 'src/echo.js',
                dest: 'build/echo.min.js'
           }
        }
    });

    // Load "uglify" task
    grunt.loadNpmTasks('grunt-contrib-uglify')

    // Load default task
    grunt.registerTask('default', ['uglify'])

};


echo.js within src/ folder
function echoNameFunction(data) {
       return "<h2>Welcome " + data + "</h2>"
}


Step 4:  Create Dockerfile
# Select the Node Module
FROM node:11

# Add the working Directory
WORKDIR /app

# COPY out package.json to our working directory /app
COPY package*.json /app/

# RUN npm install which will download all the dependencies from package.json
RUN npm install

# COPY the current content to /app folder structure
COPY . /app/

# UGLIFY the src/*.js
RUN npm run build

# EXPOSE our port
EXPOSE 9000

# Create EntryPoint of index.js file
ENTRYPOINT ["node", "index.js"]


Note: Dockerfile contains steps which get executed sequentially. Please read comments for what each steps does.

Step 5:  Create index.html
<html lang="en">
<head>
    <script src="build/echo.min.js"></script>

    <script>
        function display(){
            var name = document.getElementById('firstname').value
            document.getElementById('display').innerHTML = echoNameFunction(name)
        }
    </script>
</head>
<body>
<label for="firstname">Enter your first name</label>
<input id="firstname" name="firstname" type="text"/>
<button onclick="display()">
    Click!
<p id="display"></p>
</body>
</html>


Step 6:  Create .dockerignore file to avoid node_modules or build folder get added into the image

**/node_modules
build/*.js
.idea/

Step 7:  Finally, lets create our docker image and run it using below command.
Build Docker image
docker build -t docker-node-grunt:1.0.0 -f Dockerfile .

Run Docker image
docker run -p 9000:9000 docker-node-grunt:1.0.0

Now, open browser and hit url http://localhost:9000/


Bingo! We've successfully deployed our nodeJs application in docker using grunt.

Github Project

#codingIsAnArt